Contents
Change is the only constant, right?
Browsing habits, in particular, are changing over time; and without revamping your photography website based on recent industry standards, you’re leaving money on the table: the traffic you get will reduce and convert more poorly, leaving you with fewer leads and sales.

And you don’t want to end up with a clunky and outdated site.
Instead of working blindly on a bunch of web-design tasks for your photography website, a better approach is to read about all these significant trends and also understand the “WHY” behind all the changes. This way, you can tailor the website changes to your specific website set-up and business goals.
The web industry is continually changing. Are you in for the ride?

1. Users lack patience, so you have to make your site clear and easy to use
In this distraction era, people only spend time on your site until their phone pings them with a new notification. They’ve “learned” to quickly jump from one thing to another.
Here’s how browsing habits have changed for the impatient:
- When on your site, if visitors feel a tiny bit confused by your overwhelming navigation and cluttered design, they leave.
- When they need a few extra milliseconds to “decipher” what your site is all about, they form a worse first impression.
- When they come across a long “boring” block of text, they scroll past it.
“The higher is the cognitive load and the less intuitive is the navigation, the more willing are users to leave the web-site and search for alternatives.” (source)
Google is always trying to figure out how users make these choices, and then turning them into ranking factors and updating their algorithms.
This is where user-experience (UX) guidelines come into play:
- simplify your navigation menu (I can’t overstate this enough)
- keep the number of menu items to a max of 7, and in the right order (use dropdowns if you need more links in there)
- words used in the nav menu should be easy to understand, self-evident to your visitors
- menu should stay in a consistent and familiar place throughout your site
- logo should link back to the homepage
- everything you need to know is here: Navigation menu best‑practices for photography websites
- improve readability
- break long text blocks into paragraphs
- use headings and sub-headings where appropriate
- emphasize important parts using bold or italics
- use bulleted lists instead of long enumerations (like I just did here)
- use a comfortable font-size (16px or more) and line height (1.5-1.7)
- provide a simple eCommerce process with as few steps as possible
- quality over quantity: in your writing, in your portfolios/galleries
- group galleries into collections (especially if you have a large image archive)
- get into the habit of asking yourself questions like these (as an attempt to view your site with “fresh eyes”):
- Why do most people come to this page for, and can they quickly find that information on it?
- When a new visitor lands here, will they get overwhelmed by all the content they see, or can they easily make sense of everything? What should be taken out? What should be added?
- After they’ve consumed this piece of content on my site, where should users go next?
All these human-focused changes will, in turn, also greatly help your SEO results. Google rewards you when you provide value to people.
Almost everything I covered in my PhotoBizX podcast interview applies here.

There will always be ephemeral “fashion trends” in the web-design industry. But simplicity and good UX are here to stay, so have them in mind whenever you make changes to your website.
Hiring a professional photography web-designer, even just for giving you a thorough review of your existing design, might help you realize where you’ve gone wrong and then polish it into a thing of beauty.
Website design is entirely subjective, but it’s important to remember that your website is not meant to please you, it’s meant to be enjoyed by your audience. Any personal design preferences you might have might be detrimental to your site’s goals.
“For me, it’s all about the website. A photographer’s site should be enjoyable to view, easy to navigate, provide contact information and showcase quality work.” – Program Assistant, Non-Profit

2. People like to search, so don’t ignore text content
Everyone has become more used to searching and filtering content, instead of just exploring/browsing aimlessly.
I’m referring to:
- Google searches
- internal site image searches
- on-page searches in their browser
- using blog categories/tags or advanced image filters
This all goes back to impatience again. Users now expect to find everything more easily through searching (thanks to Google).
And an impressive 18 percent of them never visit the second page of Google search results (source). Instead, they manually change their search query, or they use Google’s suggested/related queries:

For your site to show up in search results, text content is obviously critical. Providing image search options (and plenty of metadata) can complement your galleries.

Here’s where you can add more text content to your photography website:
- Describe your photos by showing image metadata on the page: image title/headline, caption, keywords. Any other useful information (like model releases, types of licenses available, author, filename, etc.)
- “DSC01234.JPG” doesn’t mean anything. Instead, you can enhance the metadata by including valuable information like: gear used, locations & people in the photo, scientific names and abstract meanings, stories, etc.
- More on this topic here: Image SEO essentials: How to optimize for Google Image search to drive more traffic to your photography website
- Each gallery should also have a description at the top, at least a paragraph of text explaining what that gallery is all about
- Provide “context” for each main page on your site
- intro paragraphs for users to understand what they can see there
- SEO titles and meta-descriptions for Google to understand the page
- Add more text to your photo-rich blog posts. Tell the stories behind those images.
- Include all the relevant info to your About page
And if you have an extensive image archive and you’re selling prints & downloads, and you went through the trouble of adding all that image metadata into your site, include a prominent image search box.


Then follow this article on how to track internal site searches in Google Analytics.
Same thing with a big blog area: give people the option to search through your post archive and to use categories/tags to filter the posts for what they’re interested in.


3. Take advantage of the plethora of platforms and tools out there
Any web-design and marketing problem you have online… someone has already built a tool for it!
A few years ago, you had to do a lot of things manually. These days, you have a massive array of marketing and testing tools at your disposal, and the competition is fierce: photography-specific platforms like PhotoShelter or Smugmug are feeling the heat from the vast WordPress ecosystem.
Cost-wise, they can add up, but they’re relatively inexpensive. And many of them are free.
If it’s been a few years since you first built your website, take some time to review new platforms/tools out there, especially when it comes to eCommerce tools.
A small sample of other tools you can use:
- free and paid SEO tools
- broken link checker tools
- Google Analytics and the new Google Search Console
- Speed tests like Google PageSpeed Insights and Pingdom, plus Page Weight by imgIX for seeing how images affect your site speed
- Complete site testing tools like Nibbler or WooRank SEO checker
You should check out PhotoBizX’s comprehensive list of tools/resources for photographers.

4. Your website should work really well on mobile
Many photographers have already started noticing mobile + tablet traffic slowly overtaking desktop traffic in their Google Analytics reports, and those number will probably rise even further in the future:

Worldwide mobile usage now represents more than half of all Internet traffic. (source)
Google has been pushing for mobile for a long time now, bringing with it the “mobile-first” mindset that many web designers use these days.
At the very least, stop using Flash on your website (which everyone’s been saying for over 5-10 years already…) and make sure you’re using a responsive theme/template on your site (that provides a similar browsing experience, regardless of the device):

Take it one step further. It’s not just about having a responsive site, it’s about deciding what content a mobile user should see.
On bigger screens, you can afford to show more images, longer blocks of text, etc. On mobile, however, that would translate to a very long page (with all elements one below the other), forcing users to scroll a lot.
Instead, you can hide parts of the content on mobile, to only show them the essentials. Your site’s page builder might have this option, or you could hire a developer to help you do this.

Photography websites in particular need to pay close attention to how slideshows and image lightbox effects work on smaller screens. Image navigation controls need to be mobile-friendly (larger icons, larger tap target sizes), including the ability to swipe across the screen to change images in a slider. The more you can mimic navigation features from native mobile “Photos” apps, the easier will it be for users to use your site.

5. Also optimize your site for large high-res desktop screens
It’s generally OK to keep your page width restricted to around 1300 pixels, but for visual content, ask yourself whether using the full browser width is sometimes better.

This applies really well to thumbnail grids. Since you’re giving users the opportunity to pick and choose the image they want to enlarge, why not show them as many thumbnails as can fit on the page.

Alternatively, you can try to selectively increase the size of the thumbnails (from 150-200px to around 300px to take advantage of all that screen real estate).
An excellent article covering this idea of “content tiling” can be read here: Surveying the Big Screen
As for large individual images, it’s good to keep in mind that a 27″ monitor usually has a resolution width of 2560 pixels. On retina screens (like the iMac has), that goes up to 5120 pixels, which is huge. I wouldn’t recommend uploading images larger than 2000 px (except in rare circumstances for visual effect).
The obvious except here are platforms that also help you sell prints. They need the highest image size you have to be able to print at larger sizes at a good-enough quality. But most such platforms prevent image theft by automatically resizing images to a smaller size when displayed on the web.
When simply displaying images at 500-1000px (on the longest side) in your portfolio or blog, it’s good to double that size to make them look sharp on retina displays.
You have to let go of some of your image security worries though (since ill-intended people can still get the larger file from the source code), and also not go overboard with watermarking. Like many things, it’s a game of compromises (security vs. visual impact).

6. People expect websites to be really fast
And Google wants that too.
“10 seconds is the time users typically allocate to examining a page before deciding that it’s so bad that they’re going to leave.” (source)
With photography websites in particular, performance is usually an issue because of their image-heavy nature. Especially when you want to optimize for both mobile and large screens.
This article on optimizing your site’s images should be required ready for all photographers, it will teach you how to size and compress images and what tools you can use along the way: How to resize, export & compress images for optimal website performance
Beyond that, you should use a caching plugin and do some speed testing using a free tool like Google PageSpeed Insights. You’ll get detailed suggestions on how to further speed up your site (some of which might require development work, it depends on how your site is set.
You should start caring about your site’s performance, it has become an increasingly important factor in Google’s algorithms, and every extra second dramatically impacts your conversion rates:

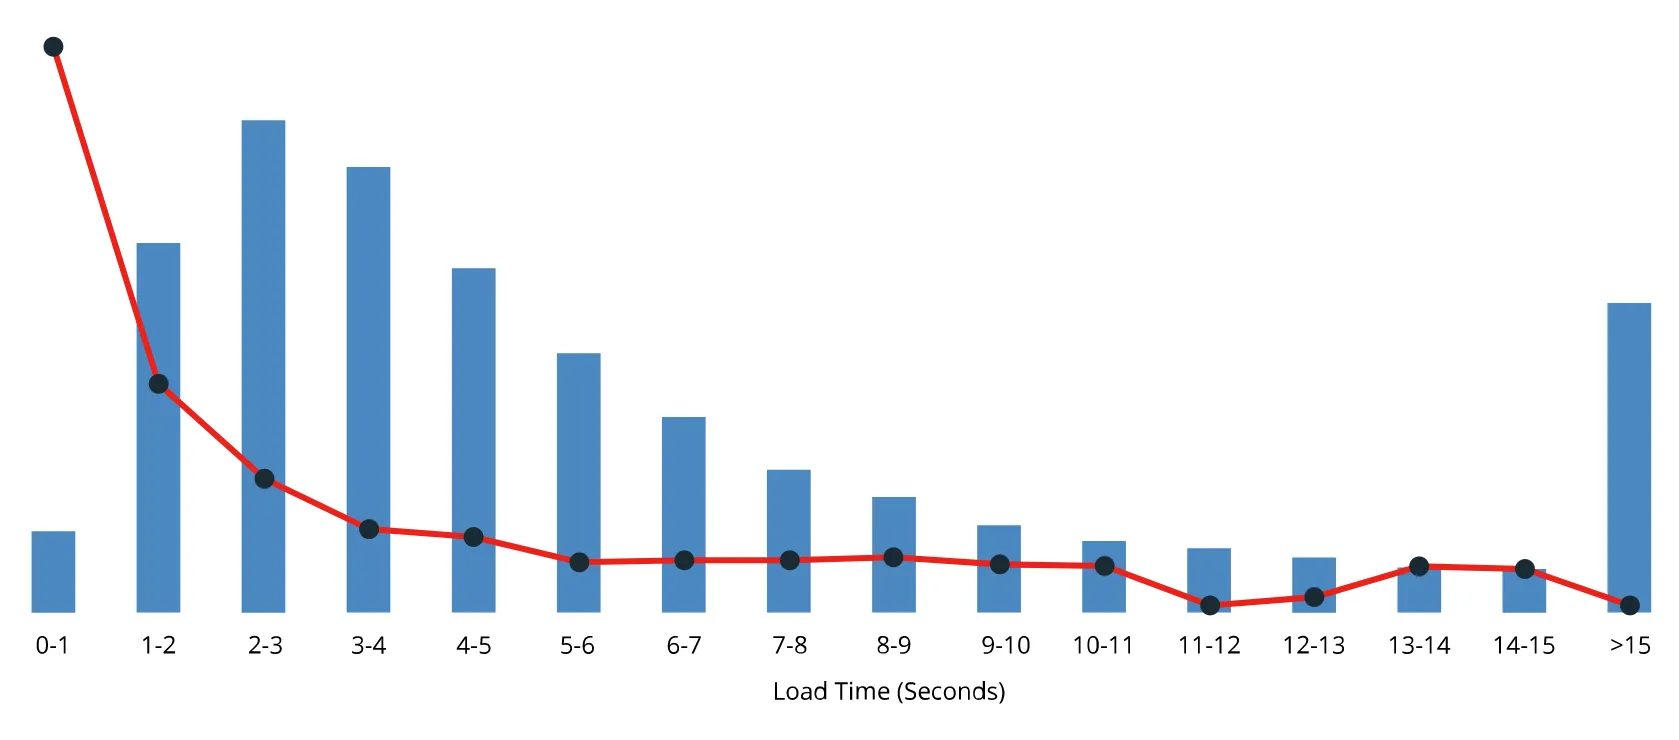 Conversion rate per Load time
More stats: How Loading Time Affects Your Bottom Line

7. Keep the site “alive” with regular fresh content
Your website can’t be “modern” when it contains outdated information.
Take some time to go through each page on your site, looking for ideas on how you can freshen up some of the content.
Here are a few ideas to get you started:
- Double check that all contact information on the site is still valid
- Can your slideshows benefit from new images, or from a slight change in their order?
- How about featuring some new galleries/projects on your homepage? It’s good to regularly add new images to the site even if you don’t shoot something new recently. Look through your computer archive for older projects that people might still find interesting. It will still be new to them.
- Maybe you have some new awards, certifications or interesting bits of information you can add to your About page.
- Is your blog area gathering dust?
Investing some time in adding new content to your site would both help maintain your traffic over time, and make the SEO gods happier.
Further reading:
- 5 Reasons Why Fresh Content is Critical for Your Website and SEO
- How often should you update your website?
Most importantly, don’t let your homepage just become a “dumping ground” of all your past content. When you add something new, take something out as well. Having fewer choices will make users more likely to take an action.
“Humans are able to make extremely sophisticated judgments in a fraction of a second. And once they’ve drawn that conclusion, they resist changing it.” – Seth Godin – All marketers
are liarstell stories

8. Leverage email marketing
Imagine having 100, or 500, or 2.000+ email subscribers who are regularly consuming what you’re writing and considering working with you (or buying images from you).
Any successful business owner these days will tell you how email marketing has been one of the most valuable channels for them.
However, photographers don’t often build email lists because of 2 common hurdles:
- the technology in doing so is a bit overwhelming: even though using popular services like MailChimp simplifies a lot of the complexity, setting up automation/workflows and working with merge tags inside email templates is still beyond the average photographer’s technical skills
- they don’t know what emails to send out: similar to blogging, photographers have a hard time coming up with ideas on what to write about in their emails (and if you don’t keep your list “warm” with regular emails, you’ll start running into problems)
Email marketing, similar to blogging (content marketing), takes a long time to “work”. But if you write consistently and keep gathering subscribers over time, it can turn into a fruitful endeavor for your photography business. You get the opportunity to reach people directly in their own email inbox, and you give subscribers the chance to interact with you directly (by just replying to any of your newsletter emails).
Even if your subscribers aren’t ready to buy services or products from you yet, you’re slowly forming a trusting relationship with them: they learn how you think, what services you offer, and they see examples of your work.

So email marketing is really a strategy you should consider going forward, but only if you’re in it for the long-term and not expect short-term sales from it. You might already be a few years late to the game, so the sooner you start, the better.
It doesn’t have to be complicated! If you’re starting from scratch, working on these initial tasks for now:
- sign up for an email marketing services (like MailChimp’s free plan)
- write down a few short emails/articles (500-1000 words)
- explain some of your services
- answer a common question you get from clients (or, if available, grab some content from your site’s FAQ page)
- showcase some recent interesting photo project you worked on (and the story behind it, not just images)
- white a short piece on what your site is all about and what people can find on it
- add a subscribe box to your site (see instructions from your mailing list service of course, including GDPR guidelines) and manually tell 10+ clients/colleagues/friends about your new email list and where they can sign-up
- send the first article to your subscribers, and schedule sending the others every week
- get into the habit of writing and sending more
- your first few emails won’t be perfect, but that’s OK. Better to ship something out into the world than getting stuck into the usual “analysis paralysis” mode
- if you set these emails up as an auto-responder series (so new/future subscribers get them automatically), you can always go back to edit and improve the content.
- the goal is to be consistent and send emails regularly (at least twice a month)
That’s it for the first few months, don’t worry about any advanced stuff for now:
- leads magnets
- multi-part workflows and email courses
- using advertising to get subscribers
- segmenting, interest groups, merge tags, goals, etc.
I plan on creating more learning material & products in the future (specifically for photographers). While we’re on this topic, make sure you’re subscribed to my newsletter to be notified when that’s available.
In the meantime, you can learn more from online resources like these:
- Send Better Emails from Your Photography Studio
- How To Create An Email Marketing Campaign For Your Photography Business
- How to Use Email Marketing in Your Photography Business

9. Learn to use the power of paid advertising
Many people are calling the “death of organic social media” and the “rise of paid placement”.
Facebook is the obvious example here. You can no longer organically show up consistency in your followers’ feeds. Instead, you have to pay to reach them.
Paid traffic has become the only solution for some people. The only “quick solution”, to be more precise (because SEO and content marketing still work wonderfully, but they take a lot of time and effort to do successfully).
An excellent resource to start learning more about this is this Facebook Ads course from PhotoBizX, along with some of the interviews on the topic, like this or this.
Other useful reading material about Facebook advertising:
- Facebook Ads For Photographers | Audiences and Targeting
- How to Create Facebook Ads that Get You Photography Clients
- Facebook Ads For Photographers: 3 Killer Ad Ideas
- The Biggest Mistake that Photographers Make with Facebook Ads

10. Choose a smaller photography niche
Every major photography market is over-saturated, with photographers struggling to find clients and being taken out of business by cheaper competitors or by (micro-)stock sites.
Without differentiating yourself, buyers will always go for the less expensive option, and you don’t want to be part of that “race to the bottom”.
The solution is to try to niche down, to find a niche within your niche:
- over time, you start specializing only in narrower types of photography
- from family photography to only shooting photos for the LGBTQ community
- from still life photos to only doing commercial work for luxury watch and jewelry brands
- from generic wedding photography to super fun wedding photography :-)
- from landscapes to only doing national park preservation projects
- you make your online presence unique
- you invest in a top-notch design
- you pay more attention to copywriting
- you raise your blogging game with consistently interesting content
- you “infuse” more personality into your site: adding funny images and a sense of humor in your writing, blogging about your experiences, curating your portfolios very tightly.
- you go hyper-local by only serving a specific city or area
- and you show that expertize by writing blog posts about that location (good venues in the city, interesting photo spots, personal opinions, etc.)
- you find different ways of marketing yourself (in publications or at industry events)
The ideal scenario (which can be reached through years of hard work) is to become a one-person niche, the “go-to” photographer for a specific type of client.
You want them to say “We need to do this. Get me [your name here]!”, because you’re the photographer that’s really well-known for that type of work.
Choosing a smaller niche can be scary at first because you instinctively fear having a smaller target audience. But the “conversion rate” will become so much higher, because it’s a lot easier to market your services to those people. They trust you more because they see that you specialize in exactly what they need. And over time, you also learn the nuances of working in that niche, allowing you to further improve the quality of your images and how you serve your clients.
By the way, here’s a cool article I found about trends in the stock photography industry, it’s worth a read: 9 Photographers on the Future Trends of Stock Photography

11. Social media sites are now just seen as temporary marketing channels
A few years ago, many beginner photographers didn’t feel the need to build their own website, and instead just settled with having a strong social media account somewhere.
But as the recent history shows, social media companies come and go, so it’s become way too risky to invest much time and effort into them.
They can change the rules at any moment (like Facebook did, requiring users to pay for advertising to reach their followers), or they can get shut down (after acquisitions, when competitors put them out of business, or simply after their natural business “life cycle”). You can’t build an independent business on “their territory”.

On the other hand, your website, on your own domain, is an asset you are in full control over (not to mention copyright control). It’s like owning a home instead of renting.
Social media sites are now just tools photographers can use to increase their reach, they’re marketing channels (effective only for specific audiences and time ranges).
It’s wise to leverage social media sites as much as possible, but don’t rely only on them. Building a strong online “home” (your own self-hosted photography website) will always be more important.

12. Pay more attention to user privacy (GDPR)
Europe’s privacy law (which affects any business with European clients, regardless of the business location) has taken the Internet by storm recently. And it’s just a matter of time before the US and other countries adopt similar measures to try to protect people’s right to privacy.
The primary way in which GDPR affects you as a photographer is that you’ll need an (updated) GDPR-compliant privacy policy on your site, and link to it whenever you’re collecting data (think newsletter optin forms, contact forms, etc.)
Since I’m not an expert in this field, here are some excellent resources on this topic that you should check out to learn more about GDPR and privacy:
- What GDPR means for Photographers – The Lowdown! (includes a link to a sample privacy policy you can use)
- How Bad is GDPR for Photographers?
- GDPR – General Data Protection Regulation for Photographers
- GDPR and your photography business

13. Don’t ignore video
With so much editorial content moving online these days, video is also becoming increasingly popular. Live video streaming is huge (see Facebook Live, YouTube Live, Periscope, Instagram live stories, Snapchat, etc.)
Especially if you shoot commercial work, the ability to also shoot video can give you a big plus in the eyes of buyers, they’ll take to time to review both your still and motion work on your site.
The transition into the realm of footage is not as smooth as one might think since not all your photographic experience translates to
Research guides like these to get started:
- Tips for Photographers Transitioning to Videography
- 7 Tips for Stock Photographers Who Want to Shoot Video
- I’m a Photographer Who Wants to Learn Videography – Here is How I Will Do It
Your About page is also an excellent opportunity to include video, as an upgrade over the self-portrait image. The video could simply explain what you do and what your website is about. It can “welcome” people to your site.
Examples:
- https://headshotphotos.ca/about/
- https://blog.kenkaminesky.com/a-lil-bit-about-me/
- http://www.mariankrausphotography.com/about/
- http://www.tonysalvagio.com/about
The video has to be shot professionally (to inspire trust), and it can include:
- you speaking into the camera, of course
- slideshow of your best photos
- behind-the-scenes footage from your work (interacting with the bride and groom if you shoot weddings, setting up your gear if you shoot portraits, adjusting your tripod if you shoot landscape)
- video testimonials (other people speaking about you)

14. Keep an eye on artificial intelligence (AI) advancements
Imagine a future when the website truly adapts to every single visitor.
The website “knows” that the user lives in Canada and likes outdoor trips, so it re-organizes your site content to show that type of content first. Personalization on steroids.
AI promises to do that in the near future.
I don’t think you can do a lot to prepare for it. My first instinct was to recommend properly captioning/keywording your images (so algorithms can rely on that data to personalize your visitor’s experience). But we’re not far away from tools/services that can accurately identify image contents.
AI has the potential to help with many things:
- spotting photoshopped images
- automatically choosing the best camera settings
- greatly improving low-light photography
- background separation and noise removal
- watermark removal
- image compression
- and many other software advances helped by AI
But don’t worry, machine learning will not replace you as a photographer. It will just take care of more of the low-level work you have to do now, letting you focus on the creative side of photography.
Conclusion
Your competitors might be one step ahead (by staying in touch with recent web-design best-practices), so it’s time to up your game.
To always stay in touch with industry changes, you need to for a few habits:
- look at other popular websites in your photography niche (to see what they’re doing that’s new/interesting)
- regularly read industry blogs (to hear of new platforms, tools, and web-design trends)
- ask for user feedback (how they found you and what their experience was when browsing your site)
Otherwise, you risk becoming complacent with what you have. You’ll just hear the whooshing sound that competitors make as they pass by you :-)
After getting a better understanding of all the trends mentioned above, what are you going to improve on your photo website?